Internet Explorer and My IRIS Web
A number of users have experienced difficulties when upgrading to the newest versions of Internet Explorer. With the initial updates to Internet Explorer 10 and 11, users encountered issues with the Employee Self-Service (ESS) functions and we’ve also had reports from users who have experienced problems with the web SAPgui.
Unfortunately, new versions of Internet Explorer are being automatically installed on many users’ machines without any notification. Users may experience difficulties because the new browser is not yet supported. This was the case with upgrades to both Internet Explorer 10 and 11. This document uses Internet Explorer 10 in the examples; however, the steps should be similar other versions of the browser. As of December 2013, Internet 10 is supported for ESS and Internet Explorer 11 will work for ESS with Compatibility Mode enabled.
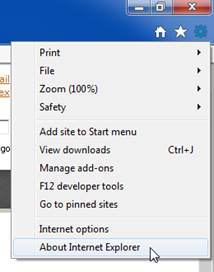
If you are unsure of your Internet Explorer level, you can generally find it in a menu option labeled “About Internet Explorer”. For IE10, you will find this option when you click ![]() (Tools) in the upper right corner of the IE screen:
(Tools) in the upper right corner of the IE screen:
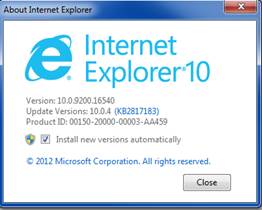
Once you click on “About Internet Explorer”, you will see the following if you have IE10 installed:
If you find that you have IE10 and you wish to uninstall it, follow the instructions below in the section Uninstalling Internet Explorer 10.
If you have Internet Explorer 9 and wish to prevent IE10 from automatically installing, follow the instructions below in the section Preventing Automatic Installation of IE10.
IE9 is the recommended browser for use with ESS, but if you have IE10 and you do NOT wish to uninstall it, you may instead use an alternate browser such as Firefox, Chrome, or Safari. There are a few known issues with some of the ESS functions in some of these other browsers as well, but there are work-around processes for these issues as detailed below in the section Alternate Browsers – Work-Arounds for Known Issues.
Uninstalling Internet Explorer 10
These instructions were prepared from a Windows 7 machine. If you are using another operating system, your steps could vary.
Before beginning the uninstall process, make sure all programs are closed. The uninstall process will require a reboot of your machine to remove Internet Explorer 10 and re-install Internet Explorer 9.
Click Start >> Control Panel.
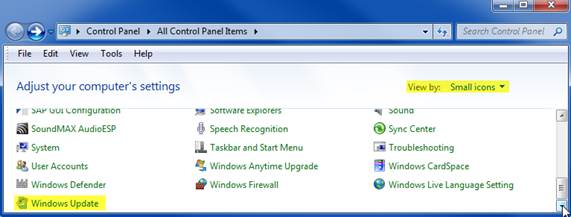
Scroll down and click Windows Update. You may need to change the View by: field to ”Small icons”.
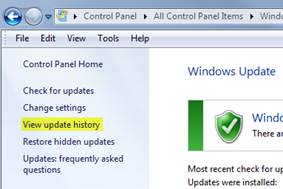
Click View update history in the left column.
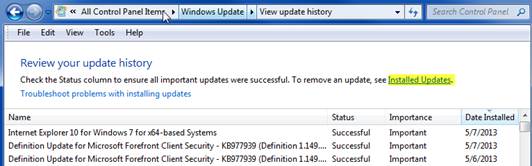
To remove Internet Explorer 10, click Installed Updates. The list of installed updates will load. Internet Explorer 10 can be found in the Microsoft Windows section.

Click the line for Windows Internet Explorer 10 and click Uninstall. Click Yes when asked ‘Are you sure you want to uninstall this update?’
IMPORTANT: You should also follow the steps in the section below to prevent automatic installation of IE10. We have had users report that they did uninstall IE10 only to have it reinstalled automatically again from their Windows Updates.
Preventing Automatic Installation of IE10
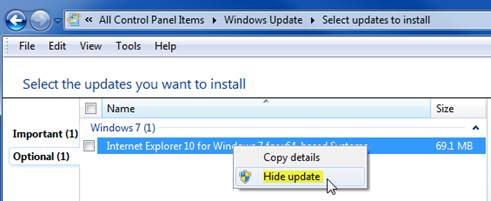
If you do not wish to install Internet Explorer 10, you can hide it so that it is not installed with your automatic updates. Click Start >> Control Panel >> Windows Updates. Click Check for updates in the left column. Locate Internet Explorer 10 in the available updates. Right click on the update, then click Hide update.
If you wish to install Internet Explorer 10 at a later date, you can unhide it so that it will be available to install. At that time, you would return to the Windows Updates control panel and choose the “Restore” option.
A list of supported browsers, known issues, and work-arounds related to the Employee Self-Service (ESS) functions in My IRIS Web is included in the FAQs and Technical Requirements document: http://iris.tennessee.edu/wp-content/uploads/sites/13/Portal-FAQs-and-Technical-Requirements.pdf